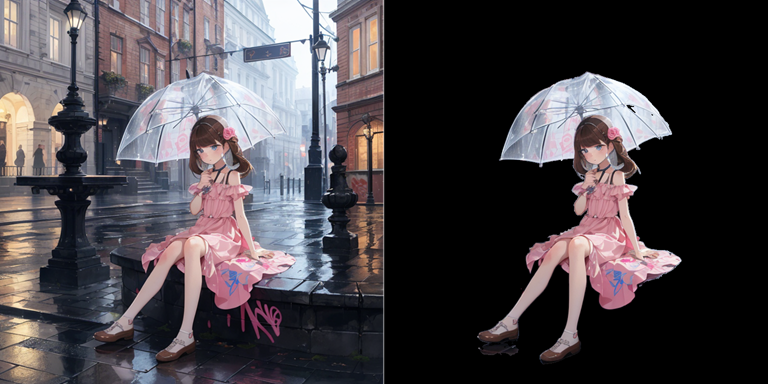
前回はAnime Segmentationを使って2次元絵の背景切り抜きをしてみましたが、今回はCartoon Segmentationを試そうと思います。
とりあえずインストールしてサンプルを動かすまでちょっと躓いた点などがあったのでメモを残します。
実行環境
OS: Windows11
CUDA: 11.8
anaconda環境下での主要なライブラリバージョン
python | 3.10.14
—
mmcv | 2.1.0
mmdet | 3.3.0
mmengine | 0.10.3
openmim | 0.3.9
—
torch | 2.2.2
torchaudio | 2.2.2
torchmetrics | 1.3.2
torchvision | 0.17.2
—
opencv-python | 4.9.0.80
インストール
殆ど公式のInstall Dependencies通りですがパッケージ管理がconda,pip,mimの3つを使っているのでちょっと不安…
仮想環境とpytrochのインストール
#プロジェクトDL
git clone https://github.com/CartoonSegmentation/CartoonSegmentation.git
cd CartoonSegmentation
# 仮想環境作成
conda create -n 環境名 python=3.10
conda activate 環境名
conda install pytorch torchvision torchaudio pytorch-cuda=11.8 -c pytorch -c nvidia
openmimのインストール
「mim install “mmcv>=2.0.0″」コマンドを実行するときに管理者権限で実行する必要があるので注意してください。
注1.mmcvのインストールは’Building wheel…’のメッセージで止まり30~50分ぐらいかかりました。
注2.ビルドが実行されているかどうかはタスクマネージャーでC++やcudaのコンパイラが動いているのを見守っていました。
pip install -U openmim
mim install mmengine
mim install "mmcv>=2.0.0"
mim install mmdet
その他のインストール
pip install -r requirements.txtモデルのダウンロード
公式ではhuggingface-cliを使ってすべてのモデルをダウンロードしていますが、セグメンテーションだけならrtmodel_e60.ckptだけを手動でmodels/AnimeInstanceSegmentationに保存すれば動きます。
mkdir models\AnimeInstanceSegmentation
#ckptファイルを上記ディレクトリに保存
OpenCVの確認
私の場合はopencvのGUI系が切られたバージョンでインストールされてしまっていました。
もし結果を見るときに「cv2.imshow()」等を使いたい場合はインストールしなおしておきます。
pip uninstall opencv-python-headless opencv-python
pip install opencv-python
動作確認
アニメキャラクターのセグメンテーションサンプルは「run_segmentation.ipynb」なので実行して確認します。
jupyterを使わない場合はpyファイルコンバータを使うかコピペして最後の行にdrawed.show()を付け加えると結果を見れます。
UserWarningについて
上記の方法でインストールし、推論を実行するとpytorchバージョンの違いにより下記の警告文が出ます。(公式詳細)
今回は実行に支障が無いので無視します。
UserWarning: torch.meshgrid: in an upcoming release, it will be required to pass the indexing argument. (Triggered internally at ../aten/src/ATen/native/TensorShape.cpp:2895.)
return _VF.meshgrid(tensors, **kwargs) # type: ignore[attr-defined]
背景除去コード
公式のrun_segmentation.ipnbではあくまでキャラクターにマスクを描画するだけなので、マスク範囲以外を切り抜きbboxは描画しない修正を加えたコードを作ります。
import cv2
import numpy as np

from animeinsseg import AnimeInsSeg, AnimeInstances
from animeinsseg.anime_instances import get_color

ckpt = r'models/AnimeInstanceSegmentation/rtmdetl_e60.ckpt'

mask_thres = 0.3
instance_thres = 0.3
refine_kwargs = {'refine_method': 'refinenet_isnet'} # set to None if not using refinenet
# refine_kwargs = None

imgp = 'examples/my-test.png'
img = cv2.imread(imgp)


net = AnimeInsSeg(ckpt, mask_thr=mask_thres, refine_kwargs=refine_kwargs)
instances: AnimeInstances = net.infer(
    img,
    output_type='numpy',
    pred_score_thr=instance_thres
)


im_h, im_w = img.shape[:2]

# 以下から修正コード

drawed = np.zeros([im_h, im_w], dtype=np.uint8)

for mask in instances.masks:
    # add binary mask
    p = 255 * mask.astype(np.uint8)
    drawed = drawed + p


masked_image = cv2.bitwise_and(img, img, mask=drawed)

cv2.imwrite('result.jpg',masked_image)