three.jsを使ってVMDファイルを切り替えたい場合のリファレンスが少なかったので日記にまとめてみました。
開発環境
OS: Windows
three.js: r158
server: python[local]
MMD model: 坂叉クロヱ【公式】© 2016 COVER Corp.
index.htmlファイルのディレクトリで”python -m http.server”コマンドを打ちサーバーを立てた後にブラウザでローカル参照するような構成を前提としています。
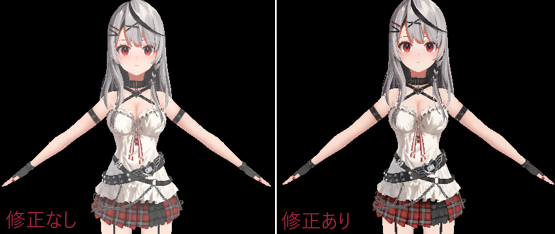
課題1: テクスチャ色褪せ補正
ネットを調べると恐らくr155~現在のバージョンまでで発生しているカラー設定問題です。
公式のサンプル通りにロードしたMMDをそのままシーンにaddすると少し色褪せた色合いになる為、モデルのロード後にマテリアル設定を修正する必要があります。
課題2: VMDファイルロード
複数のVMDファイルをMMDLoaderで用意されている関数で読み込むとVMDデータがマージされてします。
これはloadVMD関数内で”parser.mergeVmds( vmds )”が実行されてしまうためです。
これを回避して複数のVMDを個別に再生する方法案を下記に紹介します。
コードの処理概要
インポート処理
– three.jsはunpkg.comからダウンロードするようにして、ammo.jsはsrc形式で読み込み
<head>
    <meta charset="UTF-8">
    <title>VMD Switch Example</title>

    <script src="https://unpkg.com/es-module-shims@1.8.2/dist/es-module-shims.js"></script>

    <script type="importmap">
        {
            "imports": {
                "three": "https://unpkg.com/three@0.158.0/build/three.module.js",
                "three/addons/": "https://unpkg.com/three@0.158.0/examples/jsm/"
            }
        }
    </script>
    <script src="https://unpkg.com/three@0.158.0/examples/jsm/libs/ammo.wasm.js"></script>

</head>
<script type="module">
        import * as THREE from 'three';
        import { OrbitControls } from 'three/addons/controls/OrbitControls.js';
        import { OutlineEffect } from 'three/addons/effects/OutlineEffect.js';
        import { MMDLoader } from 'three/addons/loaders/MMDLoader.js';
        import { MMDAnimationHelper } from 'three/addons/animation/MMDAnimationHelper.js';
        import { MMDParser } from 'three/addons/libs/mmdparser.module.js';
        import { GUI } from 'three/addons/libs/lil-gui.module.min.js';
        ・
        ・
        ・
</script>
シーンとシーン内の要素の設定
– scene, camera, renderer, light, GUI etc…の変数用意、とアニメーション切替用のボタンを作成
// for MMD&VMD
const loader = new MMDLoader();
const perser = new MMDParser.Parser();
let helper = new MMDAnimationHelper({afterglow: 2.0});

const baseVmdUrl = './~your base url'
const vmdUrlList = [baseVmdUrl + 'walk.vmd', baseVmdUrl + 'skip.vmd',];

let mesh, currentVmdId;
var isLoadFinished = false;
var animations = [];
var actions = [];
function initScene(){
// Animation switch button
const vrmButton = gui.addFolder( 'VRM' );
currentVmdId = 0;
const params = {
func: (idx) => changeMotion(idx) // your motion switch function
};
for (let idx = 0; idx < vmdUrlList.length; idx++){
let vmdName = vmdUrlList[idx].replace(baseVmdUrl, "");
vmdName = vmdName.replace(".vmd", "");
vrmButton
.add({
executeFunc: () => params.func(idx)
}, 'executeFunc' )
.name( vmdName );
};
};
pmxファイルのロード
– load関数を使用してモデルだけ読み込みます。
– そのまま読み込むと色褪せたようなカラーになるので、これを修正します。[r155~r162ぐらいから存在している問題: three.js issue]
async function loadMyMMD() {
        loader.load('path/to/your.pmx', function(mmd){
                mesh = mmd;
                // for colorization issue
                for ( const material of mesh.material ) {
                    material.emissive.set( 0x000000 );
                }
                scene.add( mesh );
                loadMyVMD();
                },
                (progress) => console.log('Loading model...', 100.0 * (progress.loaded / progress.total), '%'),
                (error) => console.error(error)
        );
}
vmdファイル群のロード
– loadVMD関数を参考に自作します。[loadVMD]
MMDLoaderのloader(FileLoader)のload関数でvmdファイルを読み込み、AnimationBuilderクラスを使ってAnimationClipを各VMDファイルにつき一つ生成して保存します。
function loadMyVMD(){
        for (let url of vmdUrlList) {
            loader.loader.load([url], function( vmdBuffer ) {
                let vmd = perser.parseVmd( vmdBuffer, true );
                let anime = loader.animationBuilder.build(vmd, mesh);
                animations.push(anime);
            },
            (progress) => console.log('Loading ' + url, 100.0 * (progress.loaded / progress.total), '%'),
            (error) => console.error(error)
            );
        }
};
Ammo.jsのロード
– 公式サンプル (webgl_loader_mmd.html)
Ammo().then(function (AmmoLib) {
            Ammo = AmmoLib;
            loadMyMMD().catch(e => console.error('Initialization failed:', e));
            initScene();
            animate();
});
MMDAnimationHelperの設定
– helperへアニメーションを設定後にAnimationMixerから(VMDからロードされた)actionを取り出す。
function helperLoad(){
        // helper setting
        helper.add( mesh, {
            animation: animations,
            physics: true
        });

        let ikHelper = helper.objects.get( mesh ).ikSolver.createHelper();
        ikHelper.visible = false;
        scene.add( ikHelper );

        let physicsHelper = helper.objects.get( mesh ).physics.createHelper();
        physicsHelper.visible = false;
        scene.add( physicsHelper );

        // mixer setting
        let mixer = helper.objects.get( mesh ).mixer;
        mixer.stopAllAction();

        // add action(vmd) data
        for (let idx = 0; idx < animations.length; idx++){
            if(animations[idx]){
                let action = mixer.clipAction( animations[idx] );
                action.setLoop( THREE.LoopOnce );
                actions.push(action);
            }else{return false;}
        }
}
アニメーション処理
– 毎フレーム呼び出されるのでhelperとrendererのアップデートを実行していく
function animate(currentTime) {
        requestAnimationFrame(animate);
        const delta = currentTime - lastTime;

        if (delta > interval) {
            lastTime = currentTime - (delta % interval);

            if(isLoadFinished){
                // update
                helper.update(clock.getDelta());
                renderer.render(scene, camera);
            } else {
                // all vmd files are loaded
                if(animations.length == vmdUrlList.length){
                    if(isLoadFinished == false){
                        helperLoad();
                        isLoadFinished = true;
                    }
                }
            }
        }
}
切替ボタンが押された時の動作
– アニメーション(VMD)を切り替える処理。色々な方法が考えられるので後述。
切替案1: 即時
initScene関数内でボタンにセットしているchangeMotion関数をinstantSwitchAnimationに変更して下記のように実装してみました。
function instantSwitchAnimation(idx) {
        let mixer = helper.objects.get( mesh ).mixer;
        let action = mixer.clipAction( animations[currentVmdId] );
        let nextAction = mixer.clipAction( animations[idx] );

        action.stop()
        mixer.stopAllAction();
        nextAction.play();
}
切替案2: 徐々に
2つのアニメーションを時間とともにsetEffectiveWeightで徐々に切り替えてみました。
必要な変数を用意し、ボタンが押された際にフェード処理がONになるようにします。
// for animation switching
let fadeOutVmdId;
let fadeTimer = 0;
let fadeDuration = 1000 //msec
let isFading = false;
function smoothTransitionAnimation(idx) {
isFading = true;
fadeOutVmdId = currentVmdId;
currentVmdId = idx;
}ボタンが押されフェード処理フラグ(isFading)がtrueになった後はanimate関数からフェード処理用の関数うfadeAnimation関数を呼び、指定時間(fadeDuration)の間に2つのモーションのweightを変えていきます。
function fadeAnimation(dulation){
    let mixer = helper.objects.get( mesh ).mixer;
    let action = mixer.clipAction( animations[fadeOutVmdId] );
    let nextAction = mixer.clipAction( animations[currentVmdId] );


    if(fadeOutVmdId == currentVmdId){
        // cancel fade animation if same vmd ID
        isFading = false;
        fadeTimer = 0;
    }
    else{
        // init next action
        if(fadeTimer == 0){
            nextAction.reset();
        }

        // Reset if motion is not playing
        if(action.isRunning() == false && nextAction.isRunning() == false){
            mixer.stopAllAction();
        }

        // change action weight
        fadeTimer = fadeTimer + dulation;

        let weight = (fadeDuration - fadeTimer)/fadeDuration;
        if( weight > 0){
            action.setEffectiveWeight(weight);
            nextAction.setEffectiveWeight(1 - weight);
        }
        else{
            action.setEffectiveWeight(0);
            nextAction.setEffectiveWeight(1);
            isFading = false;
            fadeTimer = 0;
        }
        nextAction.play();
    }
}

function animate(currentTime) {
...
    if(isLoadFinished){
        if(isFading){
            fadeAnimation(delta);
        }

        // update
        helper.update(clock.getDelta());
        renderer.render(scene, camera);
    }
...
}